

A Better Way To Backup Your Media
- Zach Bjorklund

- Oct 7, 2020
- 9 min read
Updated: Dec 28, 2021

Have you ever gone to backup your files and realized that when you got finished there were files left on the copy that you deleted since you did your last backup? When you think of media backups, most people will just copy and paste but that will cause problems for you down the road. Doing a copy and paste on something doesn't handle errors or check item versioning by tracking any of the changes you have made. Instead your backup grows bloated or worse, erroneous.

Enter "mirror copy." This is a type of copy that is able to identify folders and files that only exist on the folder or drive you are trying to copy to. Now when you copy and paste, the folders on the right will be automatically deleted and what you are left with is a perfect representation of your source folder or drive as it exists now. Sound cool? Well it is not a new concept. There are many programs out there that support this feature but only one that seems to do so exceedingly intuitively and with the greatest ease. It's called FreeFileSync and it also works as a directory comparator, which is useful for actually taking a look at all the changes that you made in the past month or however long ago you did you last backup.

In today's post we'll break down mirror copy into it's basic steps and also take a look at how most people are backing up their media, why they're getting it wrong and headed for a world of pain, and how to fix it by covering the concept of an "in-house" and "offsite" backup. Finally we'll take a look at a utility in Windows that gives us a much better way to backup our system drive (C), and no, it doesn't involve copy and paste. Instead we'll have a system image file that we can save just in case your computer decides to do something really dumb or seriously wrong one day. Let's take a look, starting with FreeFileSync.
Mirror Copy Quick & Easy With FreeFileSync
Sometimes when we go to do a backup, we like to perform a comparison on two folders to track all the changes. Let's just say you forgot what you worked on this month and wanted to look at the results somehow. This can be done with what's called a "directory comparator." This is a program that looks at your source and target folder and spits out a list at the end that might use arrows to indicate that your files only exist on one side or the other.

When it comes to directory comparators, one of the most popular choices out there is an open source program called WinMerge. WinMerge outputs a bunch of 0's or 1's depending on what it finds when you compare a file or folder. It's not just for coders or software devs but for media pros to, as it can parse through data of a picture or video file just as well and output the results if it sees a match. But what if there was an alternative to WinMerge? Something that we don't have to visit SourceForge.net to go download. Perhaps more idiot proof and fully featured as well.
Introducing FreeFileSync! This is a program that does everything WinMerge is capable of but better. It can go through your folders on the left and right and output a comparison results list using very clear and concise symbols. FreeFileSync will walk you through the process of mirror copy and it's the perfect way to get familiarized with the ins and outs.

Not only is it just as suitable as a directory comparator but it can even perform mirror copy with the single push of a button and give you a full report. These results will be displayed for you with left and right pointing arrows as WinMerge does but now you can also edit the action FreeFileSync will take on those items before performing the copy and paste, better known in FreeFileSync as the "Synchronize" button. Doing this would qualify as a "custom sync" which we will cover later. For now, let's take a look at some of the FreeFileSync buttons to perform your first mirror copy.

FreeFileSync can be downloaded from the FreeFileSync.org website. Once you download and install, you will see two icons on the desktop. That's because FreeFileSync is even capable of automating your backups as well, should you choose to do so. This can be done on a schedule or upon certain actions using built in commands and a batch file. Batch files are a type of file in Windows that runs commands together all at once when executed. If that interests you, there are some tutorials for .bat which are pretty easy to find. This might be useful for your in-house backup disk that stays connected to your workstation as it may be able to backup project folders when you close all your programs. We'll take a look at that in another episode if you'd like, but for now let's assume we're performing mirror copy on our offsite disk for the periodical backup.
With your offsite backup disk plugged in, open FreeFileSync and click the first browse button. Navigate to a source folder that you would like to backup and click "Select Folder" in the File Explorer window that comes up. Do this for the destination folder as well by using the other browse button in FreeFileSync.

Once both the source and target directories are selected, click "Compare" at the the top and FreeFileSync will pump out a list of results.

For a file that only exists on the right, a blue arrow pointing to the left will appear. That's because the two way synchronize option is selected in FreeFileSync. We want to use mirror sync. To fix that, simply hit the gear icon at the top and go to the Synchronization tab (F8).

Here's where we can see a list of the different synchronization settings starting with two way sync (the default) and including mirror copy with two others. You can set up a custom sync by specifying what happens in each scenario by editing the five icons displayed. As indicated by the list, if items only exist on the right, they will be deleted. If you want to recover items that you changed you could change this or you could change items that are newer on the right to be updated on the left. By default they update the right with what's on the left, which is what we want for a true mirror copy but it's good to know that you have the choice and a lot of ability to customize.
With mirror copy selected, click "OK" and redo the comparison.

Now the results will show all the changes we would have intended to make for a mirror copy. All the files that only exist on the right will be deleted, and new files on the left will be copied to the right.
Finally, hit the Synchronize button and FreeFileSync will display a summary of how many files are about to be deleted and copied as well as how many are a match or inconclusive.

Check the box at the bottom to skip this screen if you only want to see the summary on the previous page. A log will also be available at the end. Now FreeFileSync will go through a mirror copy for you and display progress, emitting a notification bell at the end.

And it's that easy. Your mirror copy is complete. No more obsolete files. No more errors or broken backups. Only true mirror copies.
Offsite Backups
Before we go any further, we need to talk about what we mean by "in-house" and "offsite" backups. It would be really good to mention that if you have an external hard drive to which you are backing up your files, that is not a true backup if it stays plugged in to your computer. This is another area that people get tripped up on that I would like to address. It would be a good idea to make sure you always have two backups: one in-house on an external hard drive and one offsite, either on the cloud or at a friend's house.

That's why a very reliable cloud service like Dropbox could come in handy, especially if publishing your media to clients. It is the only one out of any of the others (Drive, OneDrive, etc.) that actually gets syncing right without screwing it up. They invented the whole concept after all. What's great about this is that your cloud storage gets a folder in your file explorer. So dragging files into it copies your media to both locations automatically if you set up your external hard drive to be a dedicated cloud mirror drive. This can be done in the Dropbox settings by moving the "Dropbox folder" from the C drive and setting it as your external hard drive.

If you do this, you could potentially copy data from other offline workstations onto this disk and sync them up on your network connected location later. Just make sure you never launch the Dropbox app without your Dropbox drive plugged in, or it could start deleting things that you have on the cloud before realizing the drive is simply unplugged.
On the other hand, If you can't afford cloud storage or you live in a remote area with slow internet, download limits etc., well this is where programs like FreeFileSync are going to really count the most as they will automate the process of offsite backups for you. Considering the fact that the vast majority of people in the nation do live in a remote area (as compared to urban centers), internet connections are far slower indeed. This post is for you.
Backup Your System By Creating an Image
Now let's shift gears to take a look at another aspect of backing up your stuff by taking it a step further and backing up more than just your media but your entire workflow along with it. If you followed along with our post from last week, you might remember separating media from programs on two different disks. Well it turns out it's possible to backup your non-media separately as well. Copy and paste doesn't work for backing up the C drive either as you might have noticed. So let's take a look at how to create a "system image" from your C drive. This will backup all your programs and preferences in Windows into an image file that Windows can re-access using a bootable device. What's cool about this is being able get your workstation back up and running fairly seamlessly in the event of that catastrophic failure we talked about last week. With a system image, your preferences are saved along with everything that was on your C drive, so no re-downloading of software is required. Simply boot with the image and your workstation is back to the way you had it, assuming all your media storage is still in order. Sound cool also? Well here's how it works.
Search for Control Panel in the Start Menu and click on "Backup and Restore (Windows 7)" under the System and Security category.

On the following screen, click the "Create a system image" option on the left.

Note: If you read into this feature, you'll actually find that it's deprecated and Microsoft recommends third party tools, but we're going to use it anyway. The only limitation to Backup and Restore (Windows 7) is really what types of storage mediums you can download it to. As an average user, just make sure you've got a big enough external hard drive, and we'll be able to create a system image. We are doing this only for the purpose of potentially restoring your workflow quicker in the event of failure. If it turns out to not work, all of our tools and software should still be available on the net for download anyway. No harm done.
After choosing to create a system image, you will get the save location screen.
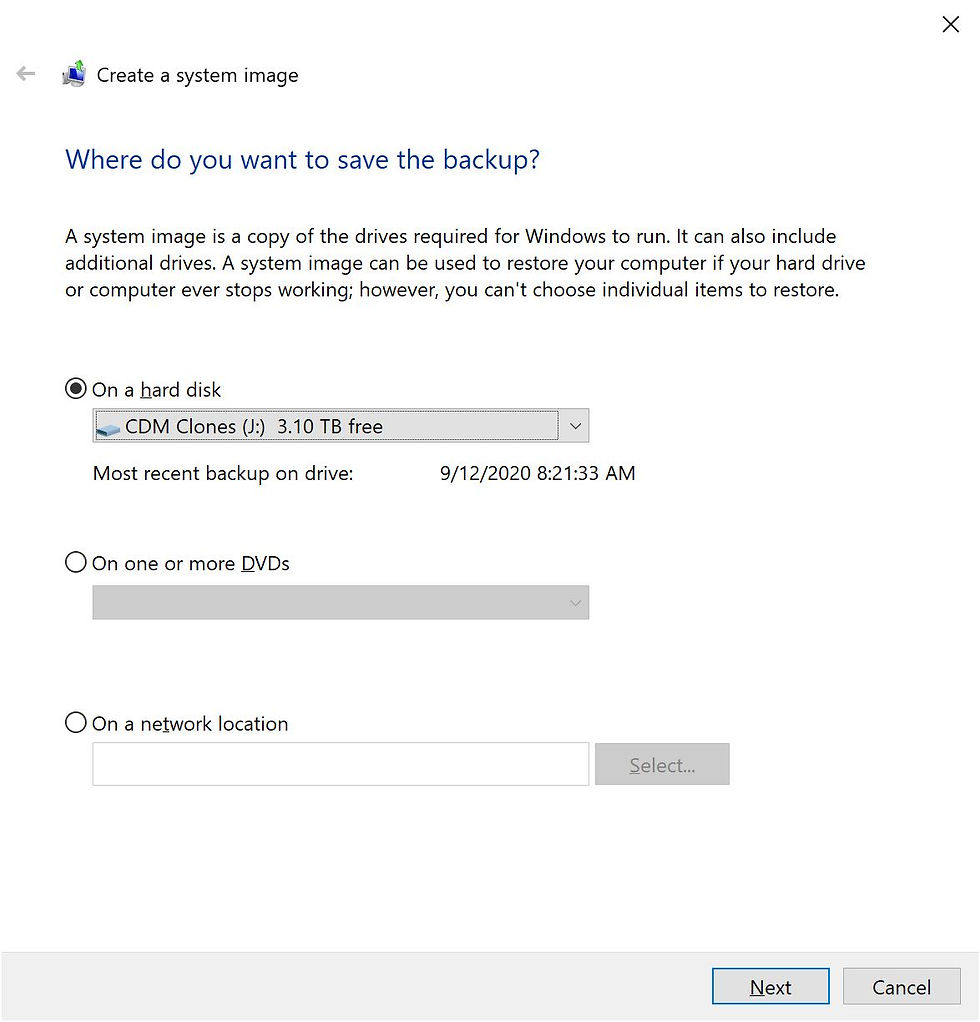
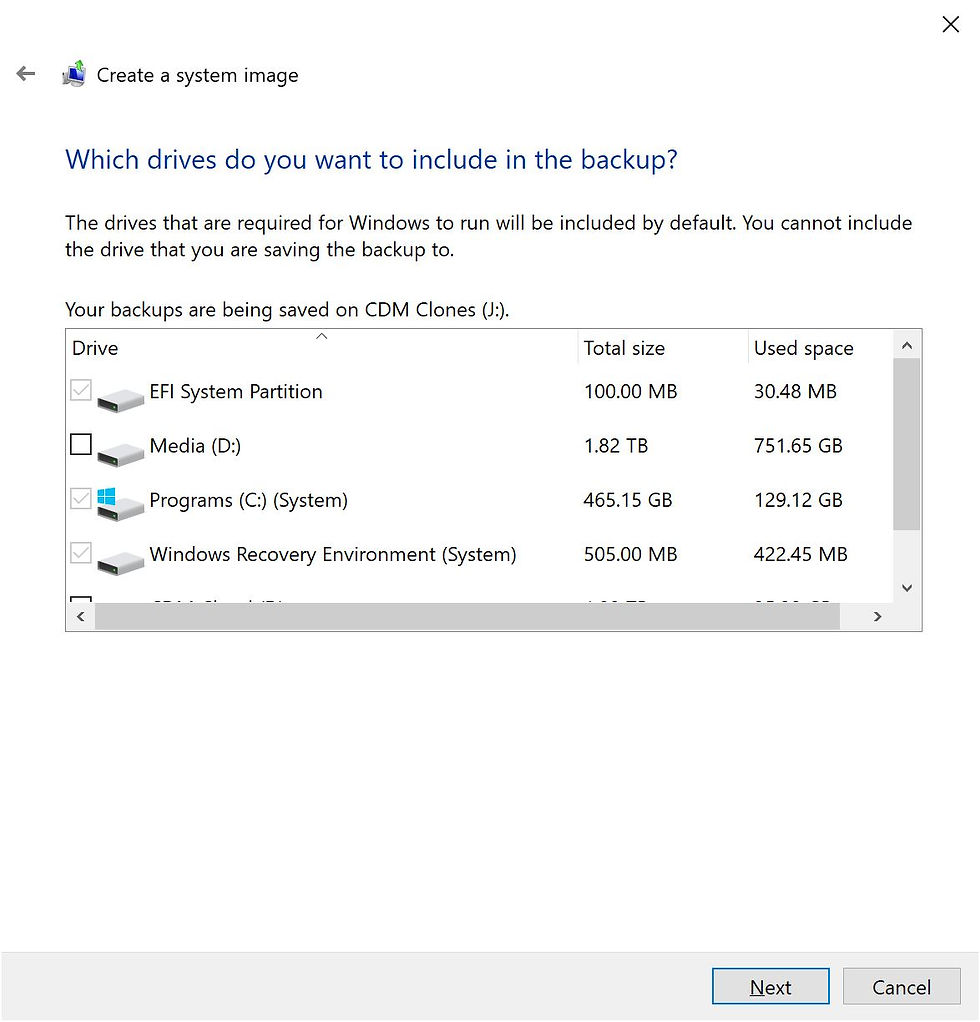
Select an external drive with enough space and hit next. On the following screen, select all the drives you want to include in the image. In our case since we already mirror copied all of our media, it will be just the C drive, along with its constituent partitions.
Click Next and on the following screen, select "Start backup."
This backup process takes a while but once it's complete, your backup will be saved into a folder on the backup drive in the format shown below with the word "Backup" followed by the year, month, and day.

This folder itself is your "system image." If you needed to use it you would plug the backup drive into your computer along with the same media you used to install Windows. If your computer is OEM or pre-built, you can create Windows installation media either by downloading the Media Creation Tool from Microsoft's website or selecting "create a system repair disk" in the control panel. This option is located on the same screen we used to create a system image.
Conclusion
Great work! Now your media and workflow is ready for full on catastrophic computer failure. Copy and paste won't get us very far. Now that you know about mirror copy, directory comparators, offsite backups, and system images, hopefully you can take your process of backing up your media and improve upon it. With the powerful tools that FreeFileSync gives you, you can take it as far as you want to go. The next time you go to look at your files on your backup disk you can sleep sound knowing that the work you did has an exact copy somewhere else.
Stay lean and keep on daydreaming everybody! We'll see you next week.
Comments